Verity Inbound API
Verity CRM Inbound API Lead Post
Inbound API Lead Post Overview
Verity allows for real-time lead delivery via an Application Programming Interface (API) post. Web forms from your school’s public sites and marketing landing pages, can be integrated to send lead records in real-time using the specified lead post instructions. The API post can also be used to create web appointment requests as well as create applicant records in Verity.
Client Services Support Process:
-
Instance Selection for Clients Onboarding :
- For Clients that are onboarding, please reach out to your Verity Project Lead to confirm the instance selection before proceeding.
-
Live Environment Client Confirmation:
- For clients working in a live environment, submit a support ticket to confirm the instance selection before proceeding.
Pre-Requisites and Requirements for Configuration
Technical Requirements Verity exposes an API layer for integrating with third-party systems. The API layer is protected and secure to ensure traffic is safely being transferred via the Internet.
Service Layer
Verity exposes an API layer for integrating with third-party systems. The API layer is protected and secure to ensure traffic is safely being transferred via the Internet.
Security
Verity is delivered via secure Internet channel (https). The API layer requires name/value pair authentication to communicate with third-party providers on behalf of a client. This authentication requires a unique tenant identifier to be provided with every lead post, as well as a secure system key.
QA
Tenant Id: to be provided/specific to tenant VeritySysKey: to be provided/specific to lead provider
Staging
Tenant Id: to be provided/specific to tenant VeritySysKey: to be provided/specific to lead provider
Production
Tenant Id: to be provided/specific to lead provider VeritySysKey: to be provided/specific to lead provider
Data Field Specifications Identifiers
| Field Name | Tag Name | Data type | Required | Note |
| Verity Security Key | veritySysKey | Text | Yes | Will be provided; max 50 characters |
| Tenant Id | tenantid | Numeric | Yes | Will be provided |
| External Lead Id | leadid | Text | Yes | Native to 3rd party; max 50 characters |
| Campaign Code | Campaigncode | Text | Yes | Native to 3rd party; max 100 characters |
| Campaign Type | Campaigntype | Text | Yes | Native to 3rd party; max 100 characters |
Lead Information
The following lead information is stored in Verity, as part of the inquiry management module. The external tag name, as it is received from third-party, will map the value to the corresponding field name in the Verity DB.
Personal
| Field Name | Tag Name | Data type | Required | Note |
| First Name | fname | Text | Yes | max 50 characters |
| Middle Name | middlename | Text | No | max 50 characters |
| Last Name | lname | Text | Yes | max 50 characters |
| Former Name | formername | Text | No | max 50 characters |
| Nick Name | nickname | Text | No | max 50 characters |
| Salutation | salutation | Text | No | max 50 characters |
| Professional Title | professionaltitle | Text | No | max 50 characters |
| Preferred Language | lang | Text | No | max 100 characters |
Demographic
| Field Name | Tag Name | Data type | Required | Note |
| Gender | gender | Text | No | max 50 characters |
| Date Of Birth | dob | Date | No | |
| Birth Date | birthdate | Date | No | |
| Age | age | Numeric | No | |
| Citizenship | citizenship | Text | No | max 100 characters |
| Nationality | nationality | Text | No | max 100 characters |
| Ethnicity | ethnicity | Text | No | max 100 characters |
| Veteran Status | veteran | Text | No | max 100 characters |
| Education Level | education | Text | No | max 100 characters |
| Employment Status | employment | Text | No | max 100 characters |
| Marital Status | maritalstatus | Text | No | max 100 characters |
| Placement Status | placementstatus | Text | No | max 75 characters |
| Placement Status Id | placementstatusid | Numeric | No |
Contact
| Field Name | Tag Name | Data type | Required | Note |
| Phone Number* | phone | Text | ! | max 30 characters |
| Phone Type | phonetype | Enum | No. Default value Home |
Equals with: Home; Work; Billing; Emergency; School; Cell or Starts with: HM; WK; BILL; EM; SC; CE |
| Work Phone | workphone | Text | No |
max 30 characters; Default type = Work available on create only |
| Email Address* | Text | ! | max 80 characters | |
| Email Type | emailttype | Enum | No. Default value Home |
Equals with: Home; Work; Billing; Emergency; School; Cell or Starts with: HM; WK; BILL; EM; SC; CE available on create only |
| Street Address* | address | Text | No | max 100 characters |
| Address Type | addresstype | Enum | No. Default value Home |
Equals with: Home; Work; Billing; Emergency; School; Cell or Starts with: HM; WK; BILL; EM; SC; CE available on create only |
| City | city | Text | No | max 50 characters |
| State | state | Text | No | max 50 characters; US address only |
| Province | Province | Text | No | max 100 characters; Foreign address only. |
| Zip | zip | Text | Yes | max 50 characters |
| Country | Country | Text | No | max 100 characters |
| County | county | Text | No | max 200 characters |
| Phones | Phones | Array of objects | ! | PhoneNumber should have max 30 characters; Allows multiple phones to be posted at once; accepted format * |
| Emails | Emails | Array of objects | ! | Email should have max 80 characters; Allows multiple emails to be posted at once; accepted format * |
Note: multiple values per contact path are accepted, if available.
! Important: A lead needs to have at least one point of contact (phone or email), meaning the lead record will not be accepted if the record is submitted without a phone number or email address.
If the "Phones" tag is used, the "phone" tag will be ignored
If the "Emails" tag is used, the "email" tag will be ignored
If the IsPreferred is posted, with the value "true", multiple times for the Phones/Emails list, only the first item will be considered preferred.
| Phones | Emails |
    "Phones": [
      {
      "IsPreferred": bool,
      "ContactType": "string",
      "ContactTypeId": numeric,
      "PhoneNumber": "string",// required
      "IsBad": bool,
      "IsOld": bool,
      "DoNotText": bool,
      "DoNotCall": bool
      },
      {
        ....
      }
    ]
all properties are optional except "PhoneNumber" |
    "Emails": [
      {
      "IsPreferred": bool,
      "ContactType": "string",
      "ContactTypeId": numeric,
      "EmailAddress": "string",// required
      "IsBad": bool,
      "IsOld": bool,
      "DoNotEmail": bool
      },
      {
        ....
      }
    ]
all properties are optional except "EmailAddress" |
Additional inquiry data
| Field Name | Tag Name | Data type | Required | Note |
| High School Grad Year | hsgradyr | Numeric | No | |
| High School Grad Date | hsgraddate | Date | No | Saves the value for the Inquiry Hs Grad Yr and Highschool (Grad Date and Grad Year) |
| High School City | hscity | Text | No | max 50 characters |
| High School State | hsstate | Text | No | max 50 characters; US address only |
| High School Province | hsprovince | Text | No | max 200 characters |
| Visa Type | visa | Text | No | max 50 characters |
| Lead Status | leadstatus | Text | No | max 50 characters |
| Lead Type | leadtype | Text | No | max 150 characters |
| Note | note | Text | No | max 1000 characters |
References
| Field Name | Tag Name | Data type | Required | Note |
| Reference First Name | referencefirstname | Text | No | max 50 characters |
| Reference Last Name | referencelastname | Text | No | max 50 characters |
| Reference Middle Name | referencemiddlename | Text | No | max 50 characters |
| Reference Phone | referencephone | Text | No | max 30 characters |
| Reference Email | referenceemail | Text | No | max 80 characters |
| Reference Address | referenceaddress | Text | No | max 100 characters |
| Reference City | referencecity | Text | No | max 50 characters |
| Reference State | referencestate | Text | No | max 50 characters; US address only; |
| Reference Country | referencecountry | Text | No | max 100 characters |
| Reference Province | referenceprovince | Text | No | max 100 characters; Foreign address only. |
| Reference ZipCode | referencezipcode | Text | No | max 50 characters |
Applicant data
| Field Name | Tag Name | Data type | Required | Note |
| External Applicant Id | externalapplicationid | Text | No | max 50 characters; Native to 3rd party |
| Program of Enrollment | programofenrollment | Text | No | max 250 characters |
| Lead Status | leadstatus | Text | No | max 50 characters; Applicant |
| Parent Signature Required | parentsignaturerequired | Text | No | Sent as Yes or No, or 0 or 1 |
| Is Form | isForm | Text | No | Sent as True or False; Allow updates for the inquiry Adm. advisor, Lead Status, Prog. of Interest and Prog. of Enrollment available on re-inquiry only |
| Shift | shiftName | Text | No | max 50 characters, if nothing is provided a default value of "Unknown" will be used when creating the application |
Compliance data
| Field Name | Tag Name | Data type | Required | Note |
| IP Address | ipaddr | Text | Yes | max 50 characters |
| Consent For Contact | consent | Text | Yes | Deprecated though still required. Sent as Yes or No, or 0 or 1 |
| SMS Opt-in | sms | Text | Yes | Deprecated though still required. Sent as Yes or No or 0 or 1 |
Web Appointment data
| Field Name | Tag Name | Data type | Required | Note |
| Is Appointment | isappt | Text | No | Sent as True or true |
| Appointment Type | appttype | Text | No | max 5 characters; Appointment Type name as configured in the Appointment Types List Inventory |
| Appointment Date and Time | apptdatetime | DateTime | No | Example of format 03/30/2020 10:00 AM |
Inventories
The following inventory items are being cataloged and maintained in Verity: Lists: Schools, Campuses, Programs, Lead sources, Terms
| Field Name | Tag Name | Data type | Required | Note |
| School Code | schoolcode | Text | No | max 5 characters |
| School Name | schoolname | Text | Yes | max 200 characters |
| Campus Code | campuscode | Text | No | max 10 characters |
| Campus Name | campus | Text | Yes | max 50 characters |
| Program Code | programcode | Text | No | max 10 characters |
| Program Name | program | Text | Yes | max 250 characters |
| Lead Source Category | channel | Text | No | max 250 characters |
| Lead Source | leadsource | Text | Yes | max 250 characters |
| Term Start | termstart | Date | No | |
| Term Start Id | termstartid | Numeric | No | |
| Highschool Name | hsname | Text | No | max 500 characters |
| Highschool code | hscode | Text | No | max 50 characters |
Note: more fields could be added, if needed.
Felony
| Field Name | Tag Name | Data type | Required | Note |
| Convicted Felon | convictedfelon | Text | No | Sent as True or False |
| Felony Details | felonydetails | Text | No | max 150 characters |
Custom Fields
| Field Name | Tag Name | Data type | Required | Note |
| Provided by client | Provided by client | Text,date,number or url | No | max 100 characters |
Client will provide the tag name and data type expected (text, date, number, or url)
UTM Codes
| Field Name | Tag Name | Data type | Required | Note | Sample Value |
| Ad Code | adcode | Text | No | max 150 characters | Campus Tour Video |
| UTM Code Id | utmcodeid | Text | No | max 200 characters | 3a55agb9g649ghbkfyhy85kygj444 |
| UTM Source | utm_source | Text | No | max 200 characters | bing.com |
| UTM Medium | utm_medium | Text | No | max 200 characters | cpc |
| UTM Campaign | utm_campaign | Text | No | max 200 characters | Barber Program |
| UTM Term | utm_term | Text | No | max 200 characters | best Barber programs in Florida |
| UTM Content | utm_content | Text | No | max 200 characters | accelerated program |
Sample request:
URL: https://apiqa.verityiq.com/api/leadpost Content Type : application/x-www-form-urlencoded Request Body: veritySysKey=123abc&tenantid=1&schoolname=School+Name&campus=Campus+Name&campaignname=Campaign+Name &campaigntype=PPL&campaigncode=YYY&leadid=05aipouy9&fname=Martha&lna me=Jones&email=f15aeiou%40aol.com&phone=1234567890&zip=32765&pub_id=DMS&program=Medi cal+Assisting&education=BD&hsgradyr=2004&ipaddr=11.22.33.44&tcpa_timestamp=2017-02-23+21%3A40%3A51+-0600&consent=yes&leadsource=Revenue+Enhancement+Group&CPL=DMS
Custom Instructions for Data Mapping
Campaign Mapping
Leads from source campaigns need to be mapped to the corresponding phone and email campaigns in Verity for task workflow.
| Source Campaign Id | Verity Phone Campaign Id | Verity Email Campaign Id |
|
campaigncode campaigntype |
Responses
| Field | Status | Message |
| veritySysKey | HTTP 401 unauthorized | Invalid system key |
| tenantid | HTTP 400 Bad Request | Lead delivery set to invalid recipient. – {sent parameter value or empty} |
| schoolname | HTTP 400 Bad Request | Lead delivery set to invalid recipient. – {sent parameter value or empty} |
| campus | HTTP 400 Bad Request | Lead delivery set to invalid recipient. – {sent parameter value or empty} |
| campaigncode | HTTP 400 Bad Request | Lead Min Required fields not met. – campaigncode is empty |
| campaigntype | HTTP 400 Bad Request | Lead Min Required fields not met. – campaigntype is empty |
| leadid | HTTP 400 Bad Request | Lead Min Required fields not met. – leadid is empty |
| fname | HTTP 400 Bad Request | Lead Min Required fields not met. – fname is empty |
| lname | HTTP 400 Bad Request | Lead Min Required fields not met. – lname is empty |
| phone OR email not provided/invalid | HTTP 400 Bad Request | Lead info invalid. – no method of contact |
| request body is missing | HTTP 400 Bad Request | Lead Min Required fields not met. – empty request |
| Unknown exception | HTTP 500 Bad Request | Note: this will require further investigation |
Decisions for Process Alignment
Prior to beginning the configuration required in Verity for real-time lead delivery, it is important to establish the responsible parties for setting up and maintaining the various areas of the system needed to facilitate this process for best outcomes.
It is recommended that Verity Administrators within the organization are chosen to lead the configuration effort, having their Verity Champions complete the following:
- Meet with Directors of Admissions or other decision-makers to understand the lead distribution workflows for real-time leads
- Meet with Directors of Admissions or other decision-makers to understand the lead assignment for real-time leads
- Meet with Marketing team or other decision-makers to understand the automated communication workflows for real-time leads
- Involve power users who would handle and audit the process related configuration of the new lead distribution, lead assignment rules to advisor teams and automated communication.
System Permissions
In order to configure lead distribution workflows, it is expected that Verity Champions and the power users delegated to complete the needed configuration are granted the permissions to:
- Create new lead vendor
- Create lead distribution workflows
- Create Teams
- Create Task Routers
- Create Campaigns
As the System Administrator, to configure or review user roles and permissions in Verity:
Go to Settings --> System --> Permissions --> Select the role --> Pull dropdown to view the permissions assigned under the role. (See Illustration 1)
Then, for the power users who need access to the configuration:
Go to Settings --> List Inventory --> System Users --> Users - Find the Verity user on the list, and then click on the pencil icon to edit the account. Ensure the user has assigned the proper role with the needed permissions to reach the necessary screens for completing the configuration. (See Illustration 2)
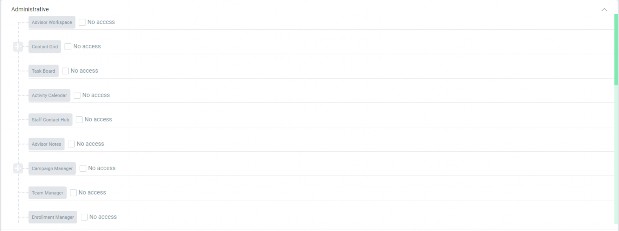
Illustration 1: System Access Configuration Screen-Role Permissions
! The user with the System Administrator role should have access to all the areas in Verity needed for the successful configuration to support new lead distrinution
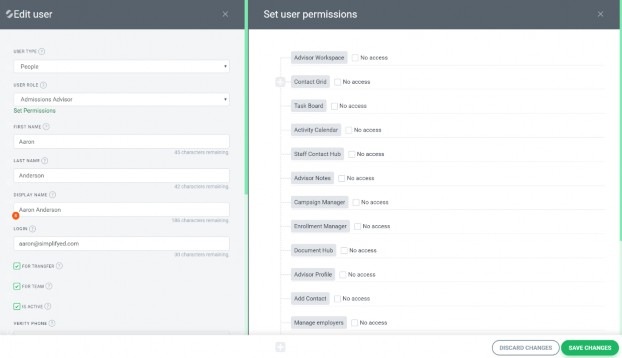
Illustration 2: User Permissions Screen
Related Configuration
Create New Team
If the process dictates for a dedicated team to place outbound contact attempts to new leads, a new team needs to be created for the designated staff, such as Campus A Admissions or Campus A Speed to contact team
! You may need to create separate teams based on your new lead distribution workflow. For example, if the new lead distribution is campus based and then a new team will need to be created for each location
To create a new team:
Go to Team Manager --> Click on the Create Team button (See Illustration 3)

Illustration 3: Create Team button
At the new team screen, you may provide a name and description for the new team, as well as click on the plus sign to add one or more staff members to the team. Designate the team lead(s) and escalation manager(s), as needed. (See Illustration 4)
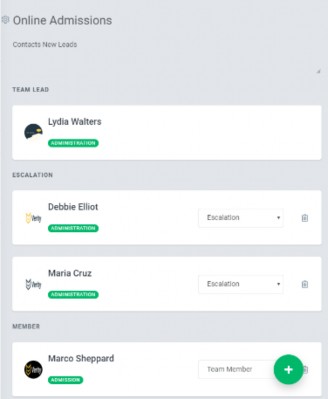
Illustration 4: Team management configuration screen
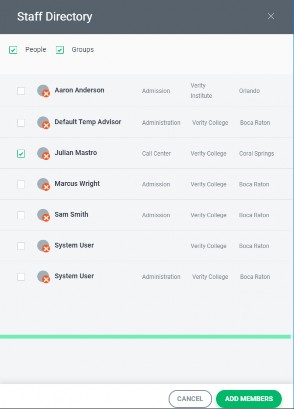
Illustration 5: New team creation screen
Create New Task Router
To broadcast tasks to a specialized team, create a new team task router and designate the take team task sequence to display the quick call tasks
! When creating a team task router both an inbound and outbound team router needs to be configured
To create a new task router:
Go to Settings --> Task Routers --> User Task Routers (See Illustration 6)
Click on the plus sign to create a new task router. Give the task router a name and description which would suggest the team selected as the recipient for the new tasks. For example: “Campus A Speed to Contact Team” (See Illustration 7)
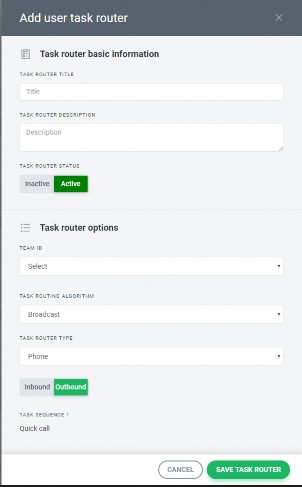
Illustration 7: Add user task router configuration screen
! For the outbound queue: The team type task router needs to
- have the algorithm set as Broadcast
- have the task router type set as phone
- be marked Active
- have the Outbound as direction
- have Quick Call as task sequence 1
! For the inbound queue:The team type task router needs to
- have the algorithm set as Broadcast
- have the task router type set as phone
- be marked Active
- have the Inbound as direction
- have Take Call as task sequence 1 and select the plus sign to complete
- have Missed Call as task sequence 2
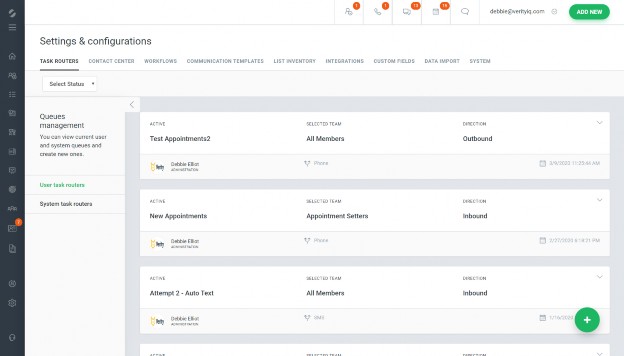
Illustration 6: Create task router screen
When clicking the plus sign – a window will appear to add a new task router. The following information is available to be populated/edited:
- Task Router Title
- Task Router Description
- Task Router status – either inactive or active (defaults to active)
Create Team Campaigns
Drip team campaigns need to be created to present the specialized team with tasks for contacting new leads
To create a new team campaign:
Go to Campaign Manager --> Ongoing Campaigns --> Team Campaign (See Illustration 8)
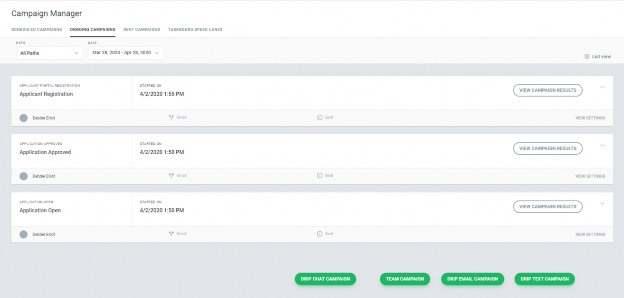
Illustration 8: New team campaign configuration screen
Follow the steps to create a new team campaign. (See Illustration 9)
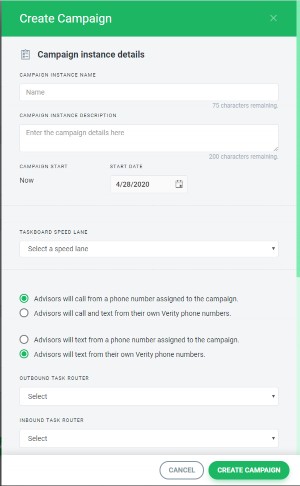
llustration 9: New team campaign configuration screen
! Option 1: Advisors will call from phone number assigned to the campaign: This option is recommended for campaigns that will broadcast the new lead notification to the team to allow the first available advisor to place the outbound contact attempt. The same phone number will be used regardless of the user placing the outbound contact to allow the inbound calls or text messages to be displayed to all team members
! Option 2: Advisors will call and text from their own Verity phone number: This option is recommended for campaigns in which you would like for all outbound and inbound call attempts to use the advisor’s Verity phone number
! Option 3: Advisors will text from a phone number assigned to the campaign: The same phone number will be used regardless of the user sending the text message and will display the response to the text message to all team members
! Option 4: Advisors will text from their own Verity phone number: The user’s Verity Phone number will be used to send text messages for the campaign and will route the replies to the user who sends the text message
Configure Re-Inquiry Management
You may configure how the system processes re-inquiry requests based on your duplicate rule and accepted lead statuses. You may also configure what fields at the master inquiry record may be changed upon accepting the re-inquiry.
To configure your re-inquiry management:
Go to Settings --> Workflows --> Lead Flow --> Re-Inquiry Management (See Illustration)
! Not allowing any changes to master inquiry record will keep all original values assigned to lead. The system will display a re-inquiry notification to the team assigned to the new lead campaign for the campus for which the lead has re-inquired.
Create Lead Vendor
A lead vendor will need to be added for any vendor for whom you wish to receive real-time leads. This includes web forms that are integrated from your public site or marketing landing pages, lead forms from social media ads and lead vendor partners.
To create a lead vendor:
Go to Settings --> Workflows --> Lead Flow --> Create Lead Vendor (See Illustration)
Enter the lead vendor’s name and select the school to complete the lead vendor assignment to the school. Assign a default advisor and enter the Enter number of days from the contact’s original inquiry date to notify users that he or she has re-inquired. A support ticket will need to be submitted to receive the secret key and tenant id to provide your lead vendor once the vendor has been added to Verity.
The system will then enter a default lead distribution with a campaign code and campaign type which reflects the value of defaultsetup (See Illustration).
This will be used as the default setting for routing a lead to a default campaign for review when the campaign code and campaign type
When adding a new lead distribution to the vendor, the following items will need to be configured
- Campaign Code - The campaign code is used in combination with the value posted in the campaign type tag to determine a unique lead distribution. This value must be sent in the new lead post.
- Campaign Type - The campaign type is used in combination with the value posted in the campaign code tag to determine a unique lead distribution. This value must be sent in the new lead post
- Default Advisor -The default advisor is assigned to the lead only if the distribution rule is unable to locate a valid lead bucket or user.
- Send to Phone Campaign- The team campaign in which the new lead task will be created when the lead is received in the system
- Send to Email Campaign- The email campaign which will automatically send the email communication when the lead is received in the system
- Send to Text Campaign- The text campaign which will automatically send the SMS communication when the lead is received in the system
- Is Silent - If the lead post is silent, the system will not create a task nor push a notification for the new lead. This is best for third-party agency transfers, when the agency posts the new lead to Verity during the transfer
- Past Due- Set the number of minutes the new lead task is expected to be handled from the time it was created. If the task is not closed within this time frame, it will be highlighted as past due at the task board. Additionally, set the past due task notification to notify the team leads when tasks are not being attended to in a timely manner.
Handling New Lead Notifications
Scenario 1: Broadcast Notifications
New Lead notifications are the first item displayed in the notification menu. The system displays the notification when a new lead is received via the API post. The notification is displayed via the broadcast algorithm which allows all representatives assigned to that New lead campaign an opportunity to contact the lead. Clicking on the notification reserves the attempt to contact the lead.
Scenario 2: Round Robin Notifications
New Lead notifications are the first item displayed in the notification menu. The system displays the notification when a new lead is received via the API post. The notification is displayed to the advisor assigned to the lead via the round robin lead distribution which allows the admissions advisor assigned to the lead, the opportunity to contact the lead. Clicking on the notification reserves the attempt to contact the lead.
Handling Re-Inquiry Notifications
- Refresh certain information on the original inquiry – contact & demographic information, program of interest, and term start of interest *
- Search for existing open tasks in the target speed to lead campaign, based on the new inquiry lead flow – de-queue all existing tasks and suppress pending re-queues;
- Create a brand new task in the To Do bucket as new lead with the highest priority **
- Push a notification on top to inform the speed to lead team of the re-inquiry
Facebook API Integration
In order to make use of the Facebook Lead Generation in Verity, you need to have a Facebook Page already setup for your institution. See more information here: https://www.facebook.com/pages/creation/
Lead generation forms could then be created from within that page.
As an example, we will take the Verity IQ Facebook page (used for example purpose only). In order to create a lead generation form, you need to access the Publishing Tools page, as illustrated in the following screenshot.

From the Publishing Tools page, access the Lead Ads Forms section, as illustrated below:
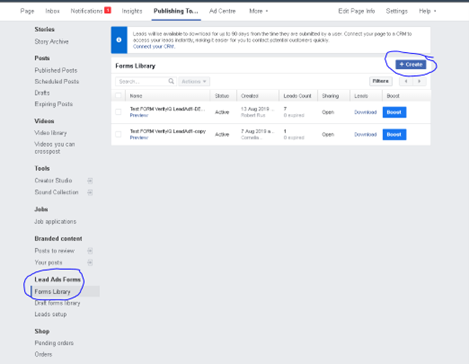
Click the Create button to create a new lead form.
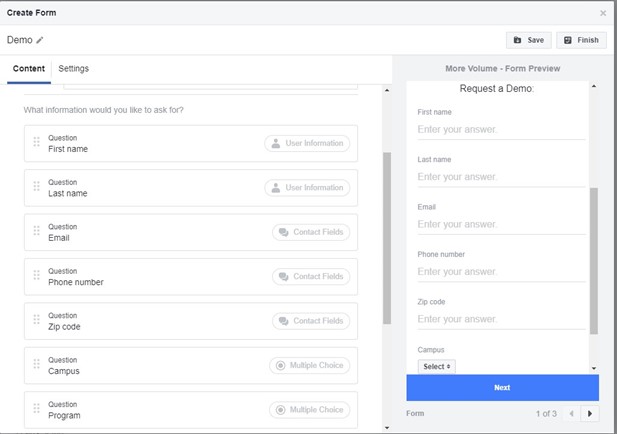
When creating a form, some of the fields will be mandatory, in order to properly create and route a new lead in Verity. Please refer to the lead post specifications, from above, for information on tags and form field values that could be accepted in Verity.
Setting the Facebook FORM visible fields
Setup the form to collect the desired information from the prospective student.
! Ensure the form collects the mandatory information for the Verity API lead delivery.
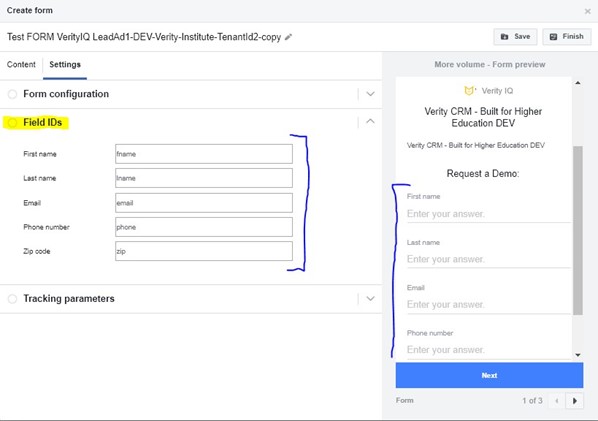
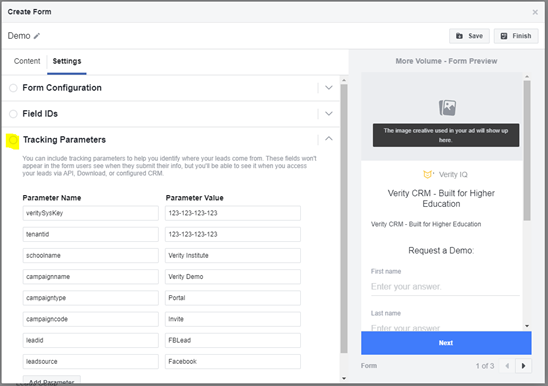
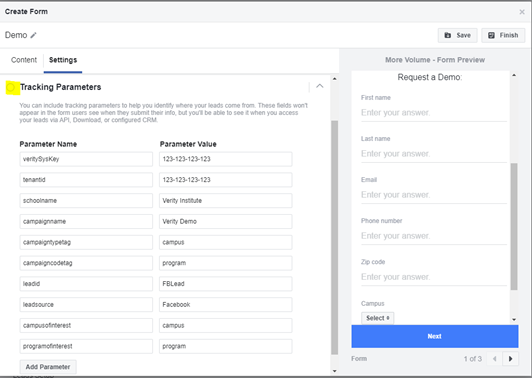
Facebook Form Tracking Parameters
Setting the BEHIND (Tracking Parameter) Fields in the Form
The tracking parameters will send to Verity API the necessary information for authentication and lead routing. For example, these fields are used to facilitate the authorization, such as the veritySysKey and tenantId, as well as indicate the key elements for lead distribution, such as campaign code and campaign type (or campaign code/type tag! ).
Extra additional parameters could also be provided by specifying additional data (custom fields).
! If the campaign code and type fields depend on a selection from a drop-down menu, use the campaigncodetag and campaigntypetag parameters instead to indicate the tag name of the field which contains the lead routing information, per your lead flow configuration in Verity. For example, if your institution routes FB leads based on campus location only, then both the campaign code tag and campaign type tag fields will contain the value of campus to indicate the API that it would need to read the values from the campus field collected with the form.
Example of form:
Example using static campaign code and type parameters:
Example using dynamic campaign code and type tags:
Connecting the Lead Form with the Webhook URL
After successfully setting up the form in the proper form, you need to connect the forms with the Verity API Facebook Webhook.
In order to set up a CRM connection and connect to the Verity API Webhook, we need to go to Leads Setup and connect the CRM, as illustrated next.
! The Verity API Facebook Webhook could be accessed via Zapier.
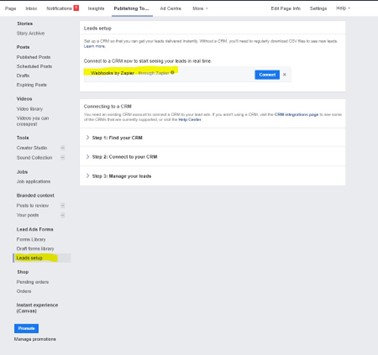
Selecting Webhooks by Zapier allows the creation of a free account and connection to our API. You may also provide the credentials for connecting to a paid Zapier account already owned by the institution.
Follow the connection steps and select the POST event that will send the form data to Verity.
Zapier Webhook Setup
Step 1. Selecting the App and Trigger Event:
Select the Facebook Lead Ads App and New Lead trigger event, as illustrated:
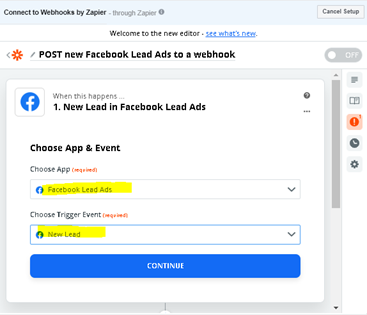
Then, choose or create the account to use in Zapier.
Step 2. Selecting the page and the form:

Select the Facebook page that contains the desired form to link to the Verity API Facebook Webhook.
After finishing selecting the form and clicking Continue, it is possible to then Test and Preview the form selections. This way, you can ensure the form is properly setup to send the new lead fields.
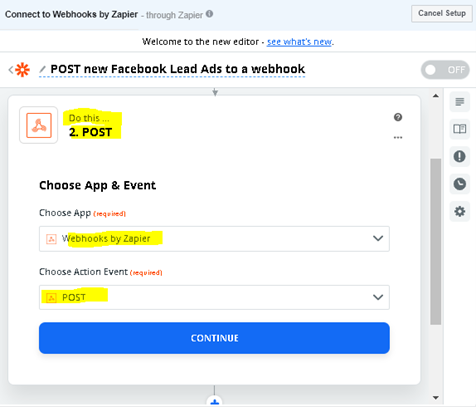
Step 3. Setting up the POST
Select the App Webhooks by Zapier and the Action Event POST, as illustrated below:
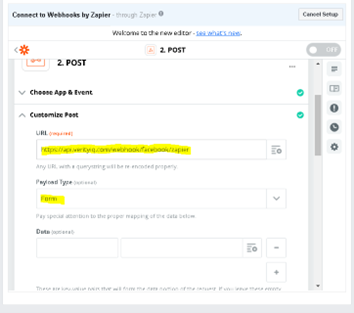
Step 4. Customizing the POST
Insert the following URL:
https://apiqa.verityiq.com/webhook/facebook/zapier
This is the webhook URL that will create the leads in your production instance of Verity. This webhook URL will receive the form field data, as inputted by the prospective students, as well as the hidden fields that are needed for authorization and campus/school/campaign selection.
In the Payload Type field, select the FORM type.
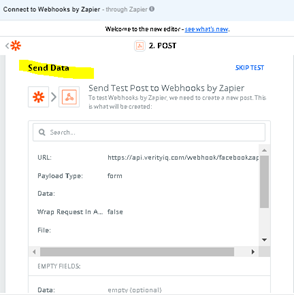
Step 5. Testing the POST
After setting up the POST URL, use the TEST & REVIEW button to test the form data.
Step 6. Finishing and starting the Zapier live
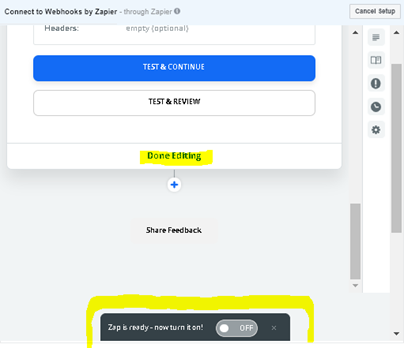
! For help with testing or troubleshooting your Facebook/Instagram connector with Verity, open a ticket with our support team by emailing to support@verityiq.com